
Important Note: Any changes inside the mimoLive document must be saved, or else they will be lost when the system automatically shuts down for the night. You must save the changes when the system is in its beginning state. When saving the document, be sure there are no thumb drives attached, no studio lights on, and the onscreen graphic should say “Insert Thumb Drive to Begin”.
Every One Button Studio+Plus setup is a bit different. The size of the room and the existing lighting can affect how well the chroma key works. When setting yours up, it can be beneficial to follow these best-practices–––for the best results.
- Eliminate variable ambient light sources, such as windows. Install curtains or blinds if needed.
- Set up the studio lights to shine from the right and left of the presenter, instead of straight on.
- Make sure the presenter is standing close to the Chromatte curtain during recording. 1″-12″ inches away is best.
- Avoid any “auto” settings on the camera.
- Change the camera white balance to match your lighting. The default setting is “daylight”, since the included studio lights have a color temperature of 5600 Kelvin.
- If you find that grays and blacks are being keyed out, try turning up the Saturation Min setting.
The chroma key settings are found in the mimoLive app, which runs behind-the-scenes, on the recording Mac, to make the magic happen. The following are the settings I have settled on in my test studio. If you find that you are struggling to get a good key, these settings are a good reset point.
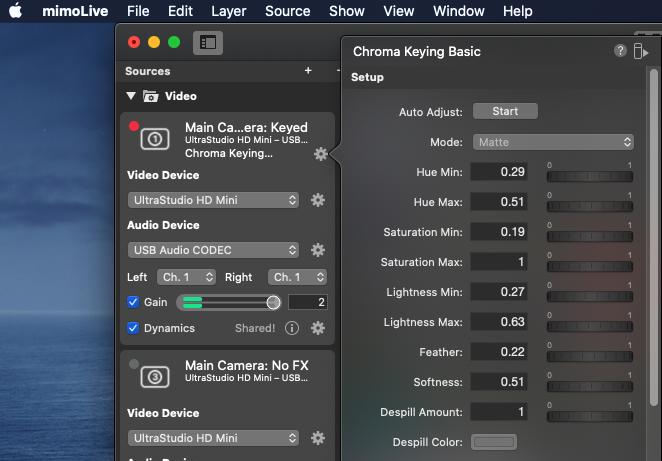
Default Chroma Key Settings
Hue Min: 0.29
Hue Max: 0.51
Saturation Min: 0.19
Saturation Max: 1
Lightness Min: 0.27
Lightness Max: 0.63
Feather: 0.22
Softness: 0.51
Despill Amount: 1
Hi Jason, how do we change the camera white balance setting?
Hi, Ken:
There is a menu button on the back of the camera, as well as arrow buttons surrounding it. The menu will pop up on-screen when activated, and the white balance setting can be found there.